 Schedule
  Schedule
After creating a new instance or opening an instance,
the instance screen is displayed
![]()
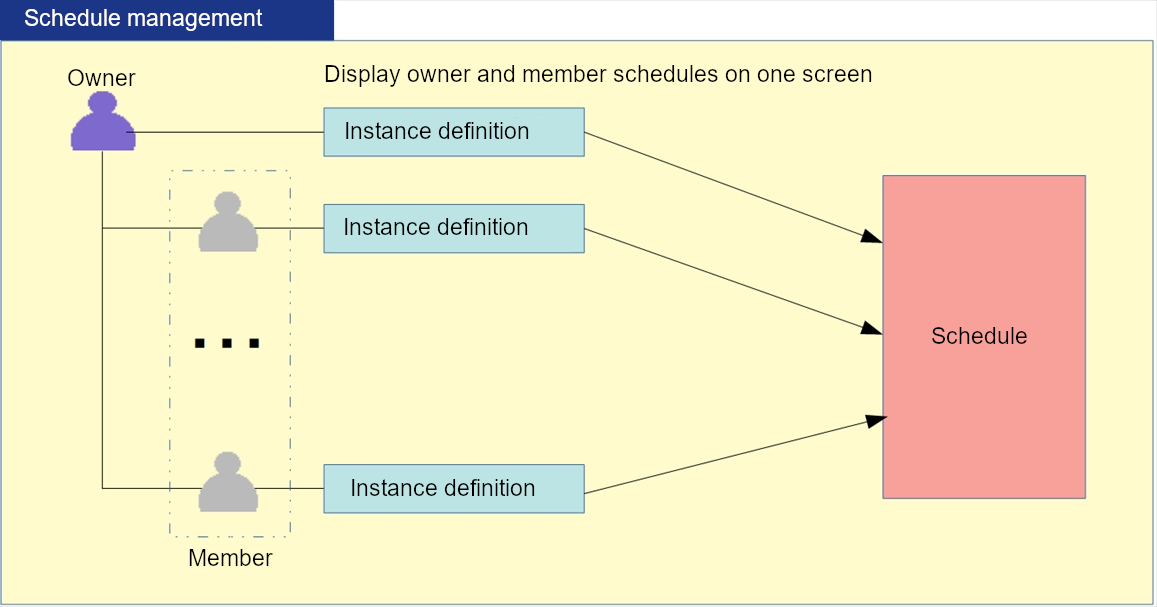
Go to the schedule by clicking Schedule on the tab.
The schedule screen is displayed.

It is divided into upper and lower sections.
The upper section shows each user's schedule,
and the lower section shows each user's start, schedule, completion date,
and progress rate.
(1) Upper
a.
User name: A schedule table is displayed for each user.
b.
ID: The first is the user ID (Ix: x is the owner number),
Lclass (Ix-y: x is the owner number, y: class serial number) and
Sclass (Ix-y: x is the owner number, y: class
serial number)
to display all Lclass
and Sclass.
c.
Schedule table: The schedule table has an upper row from the start date
to the scheduled end date (blue) for each ID and
a lower row of the completion date
(red for work in progress (percentage of progress), black for completed).

(2) Lower
a. User name: The start date, scheduled completion date, completion date,
and progress rate are displayed for each user.
b. Lclass Name: Displays the Lclass of the instance.
c. Sclass Name: Shows the Sclass of the instance.
d.
Element Name: Displays the element name of the Lclass or Sclass of the instance.
e.
Start Date: Displays the start date for Lclass or S
class.
f. Scheduled Completion Date: Displays the
scheduled completion date
for Lclass or Sclass.
g. Completion Date: Displays the completion date for Lclass
or Sclass.
h. Percentage Completed: Displays the percentage of progress if not completed.
It is set to 100% when completed.
I. ID: The first is the user's ID (Ix: x is the owner number),
Lclass (Ix-y: x is the owner number, y: class serial number) and
Sclass
(Ix-y: x is the owner number, y
: Class number)
to display all Lclass
and Sclass
(3)
Mouse movement display 1 (default: synchronization of upper and lower rows)
When the mouse is moved over the scheduled completion (blue)
in the upper row

When
the mouse is moved over the work in progress (red) in the upper row

When the mouse is moved over the completion (black) in the upper row

(4)
Mouse movement display 2 (upper and lower asynchronous)
Move the mouse over Scheduled completion (blue), Work in progress (red),
and Completed (black) in the upper row and double-click

The date is displayed only in the upper row,
and the lower row does not move (asynchronous)

When you click the mouse, it will be reflected and
moved to the bottom for the first time to display the corresponding icon

Move the mouse over Scheduled Completed (blue), Working (red),
and Completed (black) on the upper row again,
and double-click to change to the synchronized state.
(Double-click to switch between synchronous and asynchronous)
(5)
Instance movement in the lower selection
Select a class at the bottom and double-click to move to the instance and
display
the selected class

Go to the instance screen.

To return to the schedule,
click Schedule on the tab to return to the Schedule screen.